


Implementing a new business management software like NetSuite can be a game-changer for organizations. However, one of the most critical steps in this process is data migration – transferring existing data from legacy systems to NetSuite. NetSuite offers powerful tools and resources to simplify the data migration process and ensure a seamless transition. In this blog post, we will explore the importance of data migration and the steps to successfully migrate data to NetSuite.
Why is Data Migration Important?
Data migration is important because it allows organizations to maintain business continuity and leverage historical data when moving to a new system. By migrating data to NetSuite, businesses can access critical information, such as customer records, financial data, and inventory details, ensuring a smooth transition and uninterrupted operations. Proper data migration ensures that no valuable data is lost during the transition, enabling organizations to make informed decisions and maintain their competitive edge.
Key Steps for NetSuite Data Migration
- Define Migration Scope and Objectives
Start by defining the scope and objectives of your data migration project. Determine which data sets are crucial for your business operations and identify any data subsets that may not need to be migrated. Establish clear goals and expectations for the migration process. - Cleanse and Prepare Data
Data cleansing is a vital step in the data migration process. Clean up your data by removing duplicate records, outdated information, and inconsistencies. Ensure that your data is accurate, complete, and in a format that can be seamlessly migrated to NetSuite. - Map Data to NetSuite
To ensure a successful migration, map your existing data fields to the corresponding fields in NetSuite. This step requires careful analysis and mapping of data structures, field names, and formats. It is essential to ensure that the data will be accurately transferred to the appropriate fields in NetSuite. - Perform Test Migrations
Before migrating all your data, conduct test migrations using a subset of data. This allows you to identify any issues or discrepancies early on and make necessary adjustments. Test migrations help validate the mapping process and ensure data integrity in NetSuite. - Extract and Migrate Data
Once you have finalized the mapping and testing, extract the data from your legacy systems in a format compatible with NetSuite. Leverage NetSuite’s built-in tools or partner with a professional NetSuite implementation partner to import and migrate the data. Be sure to follow best practices to ensure a smooth and error-free data migration. - Validate and Verify Data
After completing the data migration process, thoroughly validate and verify the migrated data in NetSuite. Compare the migrated data with the source data to ensure accuracy and completeness. Perform data reconciliation to identify any discrepancies and make necessary corrections.
Data Migration using CSV import:
When migrating data to NetSuite, one of the most common and efficient methods is through CSV (Comma Separated Values) import. CSV import allows you to transfer your data in a structured format, ensuring a smooth transition to your new NetSuite environment. In this blog post, we will explore how to successfully use CSV import for data migration to NetSuite.
Preparing CSV Files for Import
Before importing your data, you need to ensure that your CSV files are formatted correctly. Here are some key considerations:
- CSV Format and Encoding:
Make sure your CSV files are saved in the proper format (CSV) and encoding (UTF-8) to avoid any issues during import. - Column Headers:
Include column headers in the first row of your CSV files. These headers should accurately represent the corresponding fields in NetSuite. - Field Values and Formatting:
Ensure that data values are formatted correctly according to the expected data type in NetSuite (e.g., numbers, dates, currencies). Pay attention to data formatting rules and consider using tools like Excel to clean and format data before saving it as a CSV. - Data Integrity:
Check for any inconsistencies or errors in your data. Verify that data matches the requirements and constraints of NetSuite fields and modules.
Importing CSV Files into NetSuite Once your CSV files are prepared, you can begin the import process in NetSuite. The steps may vary slightly depending on the specific data you are importing, but the general process is as follows:
- Navigate to the Import Assistant:
In your NetSuite account, go to Customization > Import/Export > Import CSV Records to access the Import Assistant. - Choose the Record Type:
Select the appropriate record type for the data you are importing (e.g., Customers, Vendors, Items). NetSuite provides a wide range of record types to cover various aspects of your business. - Upload and Map the CSV File:
Choose your CSV file from your local drive or network storage and upload it into NetSuite. NetSuite will automatically detect the column headers and display them for mapping. - Map the Fields:
Map the columns from your CSV file to their corresponding NetSuite fields. This step ensures that data is correctly placed in the appropriate fields during the import process. - Set Import Options:
Configure import options such as defaults for new records, handling of duplicate records, and error handling preferences. These settings allow you to control how NetSuite handles the import process based on your specific requirements. - Preview and Verify:
Before proceeding with the import, review the preview validation results. NetSuite will highlight any potential issues or errors, allowing you to address them before finalizing the import. - Import and Validate:
Once you are satisfied with the preview results, proceed with the import. NetSuite will process the CSV file, importing the data into the corresponding records. After the import, verify the imported data for accuracy and completeness.
Challenges using CSV import for data migration:
In NetSuite, when importing data using CSV (Comma Separated Values) files, there are certain limitations and considerations to keep in mind. While CSV imports can handle a wide variety of data, there are some objects or data types that may not be directly imported using CSV.
The types of objects that can be imported using CSV in NetSuite include:
- Standard Records: This includes basic records like customers, contacts, vendors, items, employees, leads, and other standard entities within NetSuite.
- Custom Records: NetSuite allows users to create custom record types tailored to their specific business needs. These custom record types can also typically be imported via CSV.
- Transactions: Certain transaction records like sales orders, purchase orders, invoices, and bills can also be imported using CSV. However, these may require more complex mappings due to their multi-level nature.
- Lists: Lists such as price levels, currencies, units of measure, and other lists used within NetSuite can generally be imported via CSV.
- Sublists and Line Items: For records that contain sublists or line items (e.g., sales orders with multiple line items), these can often be imported along with their parent records using CSV import.
- Custom Fields: CSV import supports importing data into custom fields defined on standard or custom record types.
Objects that typically cannot be directly imported using CSV in NetSuite include:
- Complex Records: Objects with complex structures, such as transactions (like Sales Orders, Purchase Orders, etc.), may require more than a single CSV file to import due to their multi-level nature.
- Subsidiary-Specific Records: Records that are specific to subsidiaries might need additional configuration or specific handling during import.
- Multi-Select Fields: Fields that allow multiple selections from a predefined list (multi-select fields) may not be directly imported via CSV. These require special handling to ensure that the correct values are mapped during import.
- Custom Records and Fields: Depending on the configuration, custom records and fields might require additional setup or handling during CSV import.
- Binary Data: CSV files are text-based and may not be suitable for importing binary data like images or files directly.
- Certain System Fields: Some system-generated fields or fields with restricted access may not be directly importable via CSV.
- Permissions and Access Controls: Importing data might require appropriate permissions and access controls.
When encountering such scenarios, it’s common to use alternative methods for importing data, such as SuiteScript (NetSuite’s JavaScript-based scripting) or SuiteTalk (NetSuite’s SOAP-based web services). These methods offer more flexibility and can handle a broader range of data import scenarios compared to CSV imports alone. At CCUBESUITETECH, our experienced NetSuite Developers can help navigate complex import requirements and find suitable solutions for importing various types of data into NetSuite.
Queues and Multi-Threading in CSV Import: 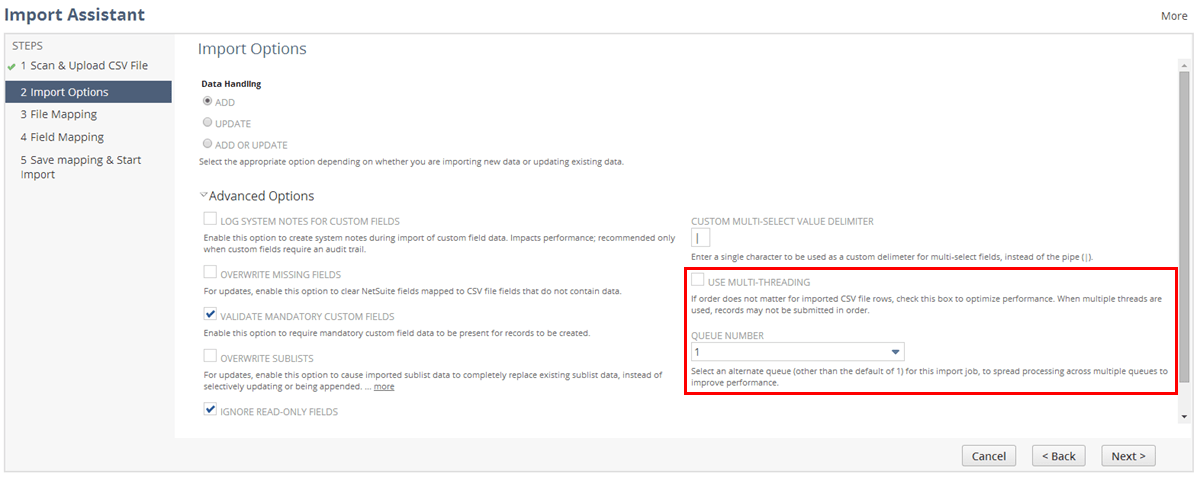
You can set a queue number from 1 to 5, to spread the processing of import jobs across multiple queues, instead of using a single queue for all jobs.
By default, a single thread is used for processing CSV import jobs, and each CSV file row is submitted in order. In accounts that have purchased a SuiteCloud Plus license, an option is available to use multiple threads. If this option is enabled for an import job, processing is optimized across multiple threads for best performance, and the order in which CSV file rows are submitted cannot be predicted. Accordingly, you should only enable multi-threading for an import job, if the order in which rows are submitted does not matter, meaning later CSV file row data is not dependent on any earlier row data.
Using queues and multi-threading in CSV import in NetSuite can help manage large volumes of data efficiently while minimizing disruptions to regular business operations. Here’s how you can approach it:
- Data Segmentation: Divide your data into manageable segments based on logical criteria such as record type, creation date, or any other relevant factors. This segmentation helps in organizing your migration process and ensures smoother execution.
- Queue Management: Implement a queue system to handle data migration tasks. You can use NetSuite’s SuiteScript along with SuiteTalk or SuiteQL to create and manage queues. This involves creating a custom record type to represent migration tasks and a scheduled script to process these tasks in batches.
- Batch Processing: Break down the migration tasks into smaller batches to prevent overloading the system. Each batch should contain a manageable number of records to be migrated. Process one batch at a time to maintain system performance.
- Error Handling: Implement error handling mechanisms within your migration scripts to identify and handle any issues that arise during the migration process. Log errors and failed records for later review and resolution.
- Retry Mechanism: Incorporate a retry mechanism for handling failed migration tasks. Some records may fail to migrate initially due to various reasons such as validation errors or temporary system issues. Implement logic to automatically retry failed tasks after a certain interval.
- Monitoring and Reporting: Set up monitoring and reporting capabilities to track the progress of your data migration process. This helps in identifying any bottlenecks or issues that may arise during migration and allows for timely intervention.
- Testing and Validation: Thoroughly test your migration scripts in a sandbox environment before running them in the production environment. Validate the migrated data to ensure accuracy and integrity.
- Communication and Coordination: Keep stakeholders informed about the migration process and any potential impacts on business operations. Coordinate with relevant teams to schedule migration activities during off-peak hours to minimize disruptions.
By following these best practices and leveraging queues and multi-threading for data migration in NetSuite, you can ensure a smoother and more controlled migration process while minimizing risks and disruptions to your business operations.
Field mapping of CSV file fields to NetSuite fields: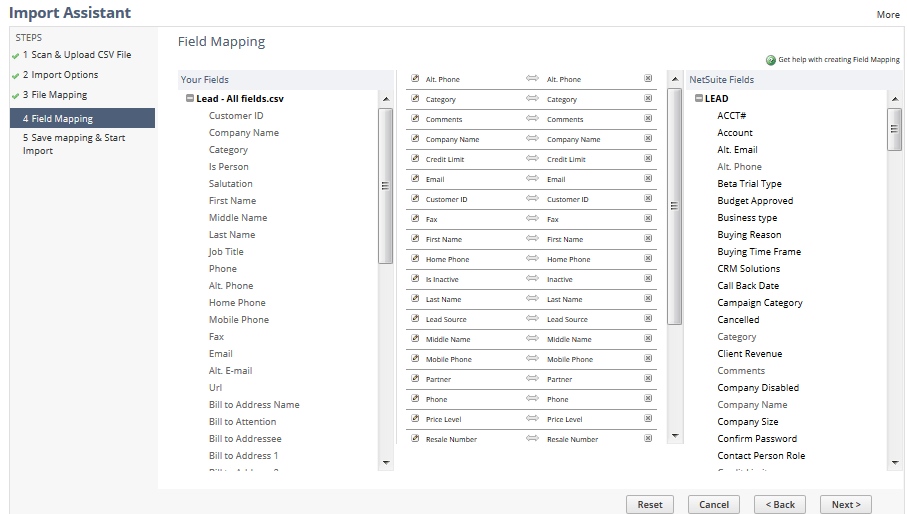
- CSV file fields are listed in the left pane.
- Field mappings display in the center pane; blank spaces indicate that a field needs to be mapped.
Required fields are marked with ( Req ). You must map these fields or provide default values for them.
- NetSuite fields are listed in the right pane.
- Fields that have already been mapped appear dimmed.
- Fields available for mapping are in darker text.
- Custom fields are marked with a special icon. (
 )
) - Key fields are marked with a special icon. ()
 )
) )
)To manually map fields: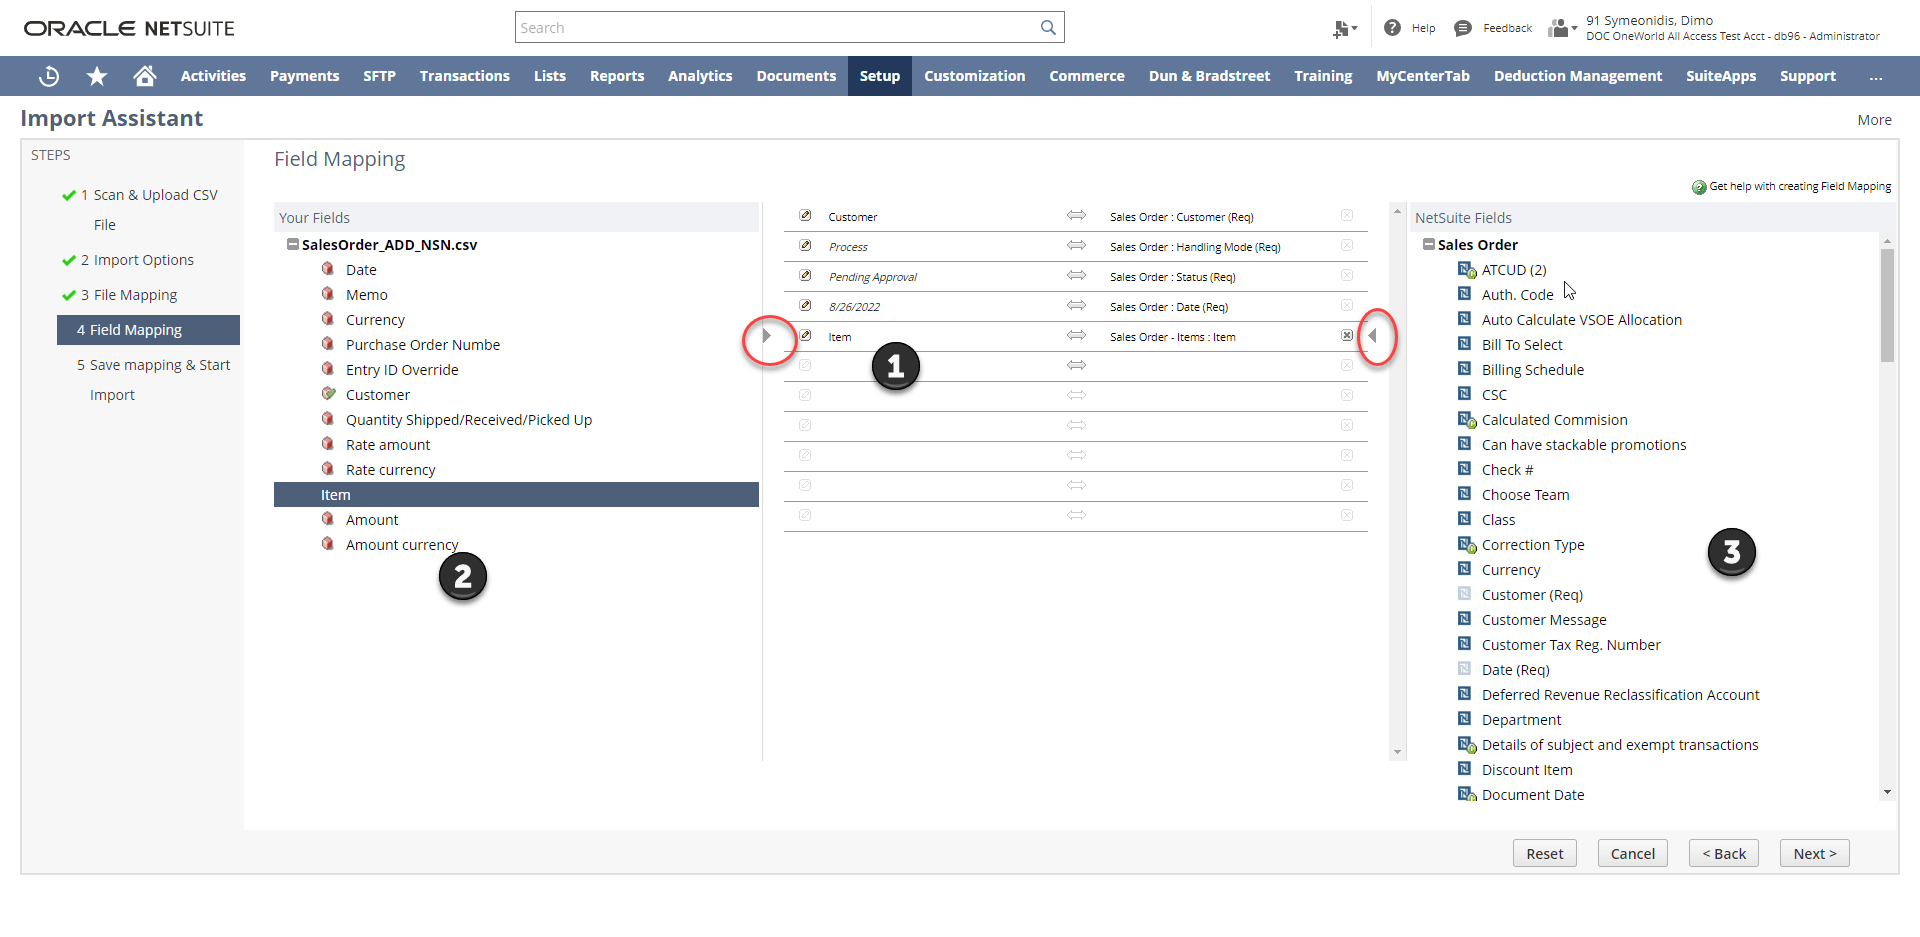
- Click on the first available empty row in the center pane. The arrows on each side of the row, indicate the row you are editing.
- Click on the CSV file field you want to map in the left pane.
- Click on the NetSuite field in the right pane to map it with the CSV file field.
Best practices to ensure a successful CSV import in NetSuite:
- Start with a test import:
Before importing large datasets, perform a test import using a smaller
subset of data to validate the import process and verify data integrity. - Follow NetSuite’s data import guidelines:
NetSuite provides extensive documentation and resources detailing specific
requirements and recommendations for each record type. Familiarize yourself
with these guidelines to avoid common mistakes and ensure a smooth import. - Monitor the import log and error reports:
After each import, review the import log and error reports provided by
NetSuite. These reports help you identify any issues, errors, or areas of
improvement for future imports. - Maintain data backups:
Before running any import, ensure you have a backup of your data. In case
of any unforeseen issues during the import process, you can revert to the
backed-up data. - Leverage NetSuite’s tools and resources:
NetSuite provides various resources, including templates, sample CSV files,
and import scripts. Utilize these tools to streamline your import process and
ensure data accuracy.
For additional information regarding the NetSuite Data Migration and to make Data migration from any legacy system to NetSuite and other customizations, you can rely on CCUBESUITETECH, a top-notch provider of NetSuite Consulting Services. Our team of certified NetSuite Developers can assist you in with any kind of customizations and unlocking the full potential of NetSuite for your business. To schedule a call with CCUBESUITETECH, click here.
